In the Layer there are certain scenarios where actions that are carried out will trigger an email to either be sent to your customers or your internal staff.
Mail Template options within Company Settings
Once an email template has been created in the Layer we can apply it to certain scenarios that are created within the Layer, we will now outline these scenarios:
Internal Emails:
When certain scenarios are carried out it is possible to alert users to any information that they will need to know about e.g. when an appointment is assigned to a user
- Appointment Created (Internal): The email template generated against this will notify staff internally of any appointments created in their name e.g. presales staff book an appointment for sales staff.
- Lead Reassigned: This will notify staff if they have been assigned a lead or if a lead has been reassigned to another member of staff
- Customer Reassigned: This will notify staff if they have been assigned a customer or if a customer has been reassigned to another member of staff
- Customer Delegated: If a user is delegated access to a customer record then a notification will sent to them.
- Appointment Status Updated: If an appointment status is updated this will trigger an alert
- Tasks Reassigned: If a task has been reassigned then this trigger an alert using this email template
- Quotation Owner Changed: This is used to alert users when a quotation owner has changed i.e. the original owner and the new owner
- Commission Request Updated: Once a commission request has been approved or declined then this will alert a user by emailing this alert to them
- Customers Reassigned: If customers are reassigned then this email can be generated to update users
- Quotation Created: This will be used to notify any users who have the correct alert assigned when a quotation has been created
- Reminder Alert: This will trigger any reminders that need to be sent to users
- Quotation Won - internal: This is used to alert users who have the notification set in their profile of any quotations that have been won
- Cases Reassigned: This can be used to alert users when cases have been reassigned
- Opportunity Created - Internal: This can be used to notify internal users of any opportunities created
- Opportunity Owner Changed - Internal: This can be used to notify internal users when an opportunity owner is changed i.e. the original owner and the new owner
External Emails that can be sent to your customers and suppliers:
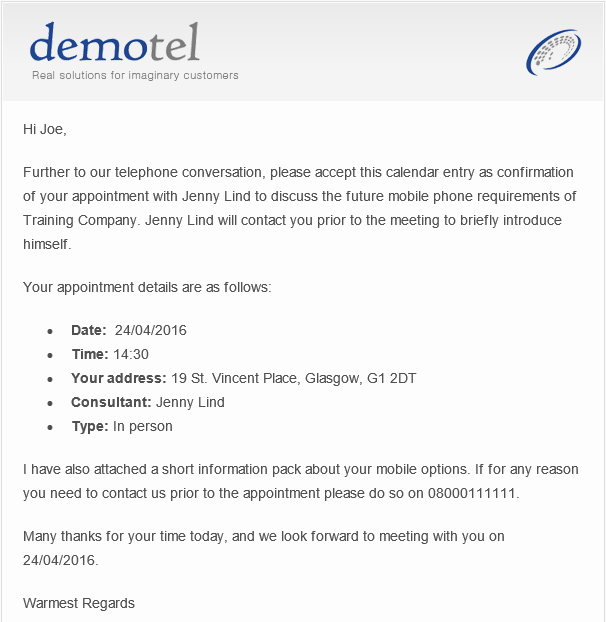
- Appointment Created - Customer: The email template that is populated to send your customers or lead to informing them of any appointments that have been booked with them.
- Portal Welcome - Customer: This will be used to trigger a welcome email to any customers who are marked as portal users
- Portal Case Created - Customer: This can be used to trigger an email alert to your customer to inform them that a portal case has been created
- Portal Case Updated - Customer: This can be used to trigger an email alert to your customer to inform them of any updates
- Quotation Won - Customer: This is used to notify your customer when they have signed a quotation and can be view as a thank you message.
- Purchase Order: This can be used to trigger an email to send a purchase order to your suppliers when the PO has been created
- Invoice Update: This can be used to send any invoices to your customers
Action Requests:
- Commission Request Received: This email is used to generate any commission requests that need to be approved
- Website Lead Recieved: This can be used to trigger any alerts when your company receives any website leads, notifying you that work is required.
Creating a mail template
Once you have studied the above options of where an mail template can be applied you must first create your mail template.
To learn how to create a mail template click here.
Applying a mail template within company settings
Now that you have created your mail template you now need to apply the appropriate mail template to your mail templates within Company Settings, to do this follow these simple steps:
1. Select  from the top right-hand side of your screen
2. From here select Company Settings under Essentials on the left hand side of your screen
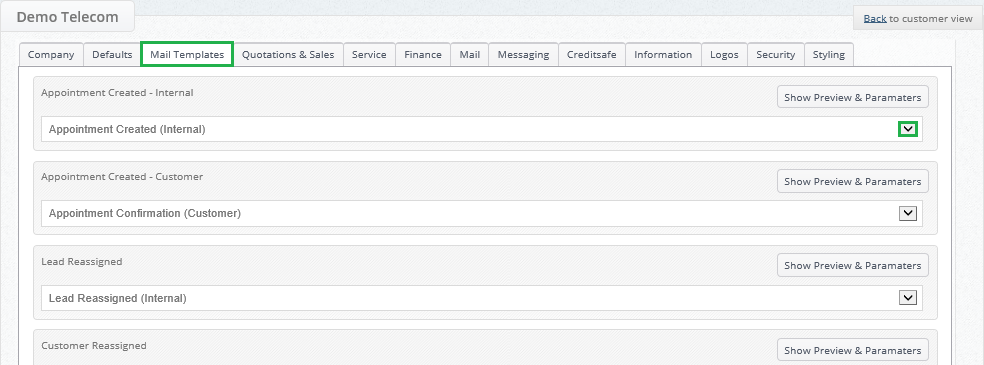
3. From here select the Mail Templates tab
4. You will now be required to map your mail template against each of the Mail template options that we have discussed above, to map your template simply select the appropriate Mail Template from the drop down menu.
6. If you are unsure if you have selected the correct template press the  button and the Layer will populate a preview showing both the applicable parameters and the body of the email that will trigger:
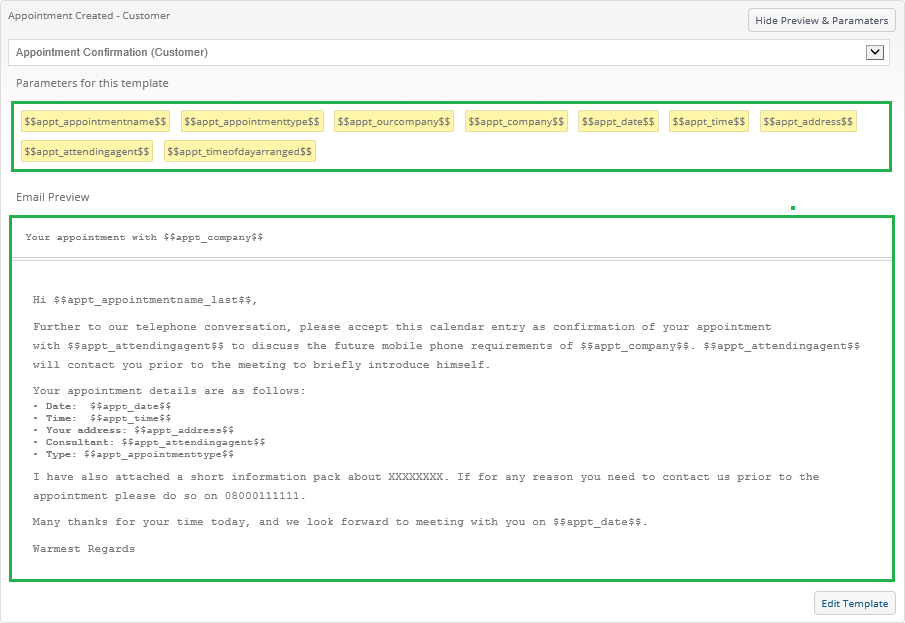
7. If you need to edit the template simply press the  button and you will be redirected towards the original mail template and you can make the appropriate edits.
8. Once all of your mail templates have been mapped against the different scenarios press  .
.
Example of a mail template:
In the example above you will see that we previewed the customer appointment confirmation email, in the image below you will see how this is presented to the customer when sent: