Within the Layer it is possible to create hyperlinks anywhere you see the  symbol.
A hyperlink is simply where you can provide a link to another webpage within the body of a piece of text which is activated by clicking on a highlighted word within the body of your text.
For example when creating an email template you may wish to provide a hyperlink to direct your customers to a webpage that may be applicable to them of on interest.
Hyperlinks can be added to email campaigns, email templates, output templates etc. within the Layer and where you see the hyperlink symbol will allow you to create one.
Hint: We have created a hyperlink on the work email template above, clicking this link will demonstrate how to create an email template within the Layer.
How to create a hyperlink
To create a hyperlink within the body of your text follow these simple steps:
1. Press the hyperlink symbol where you see it: 
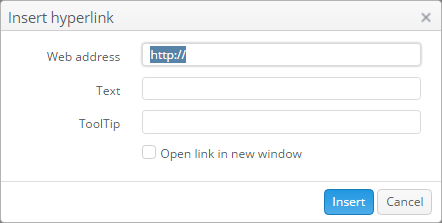
2. This will open the Insert hyperlink window:

3. We now need to populate the following:
- Web address: Populate this field with the webpage address of where you want to direct your contact or user to by copying and pasting your link to prevent errors.
- Text: Enter the text that you want your hyperlink to display as, e.g. in our example above we used the work email template.
- ToolTip: In this field you can enter a message that will appear when a cursor is positioned over the hyperlink text
- Open link in new window: Ticking this option will mean that your hyperlink opens in a new window tab for when click on
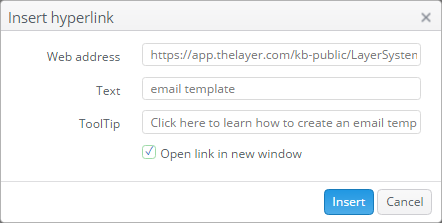
In the image below you will see our example for the hyperlink we added above:

4. Once you have created your hyperlink press 
You have now inserted your hyperlink.
TIP: Once you have created your hyperlink we recommend that you click on it to test it, to ensure that you have populated the right hyperlink.
Delete a hyperlink
To delete a hyperlink once you have created it follow these simple steps:
1. Locate the source of your hyperlink e.g. email campaign, output template, email template etc.
2. Click on the text from the original source of where you created your hyperlink e.g. the original email template, original output template etc.
3. Click on the Remove Hyperlink button that will appear 
4. You have now removed your hyperlink.
Edit a hyperlink
To edit a hyperlink once you have created it follow these simple steps:
1. Locate the source of your hyperlink e.g. email campaign, output template, email template etc.
2. Click on the text from the original source of where you created your hyperlink e.g. the original email template, original output template etc.
3. Click on the Hyperlink button that will appear 
4. This will repopulate the Insert Hyperlink window and will allow you to edit your hyperlink as appropriate.
