Within the Layer it is possible to add check lists to a sales order that has been created within your instance of the Layer.
Check lists have been designed to help users ensure they do not miss any steps that are required when completing a sales order and can help users prioritise the steps that are required.
N.B. check lists can also be added to Case Categories and Product Opportunities and are different to sales order check lists
Creating Check List Steps for Sales Orders
In order to add check lists to a sales order you must decide which of your order types your sales order check list will apply to and identify the individual check list steps.
In our example we are going to be creating a check list for mobile handset orders with the following check list steps:
- File received - Last 3 months bills
- File received - Proof of address
- File received - Proof of I.D.
- Credit Check - Ensure credit check has passed
In order to add these steps to any orders that have a mobile handset/device attached we must identify the product category that mobile handsets belong to then the steps will be added to the product category, to do this follow these simple steps:
1. Log into the Layer
2. Press the  Settings button from the top right hand of the screen
3. Under Inventory Settings, select Product Categories
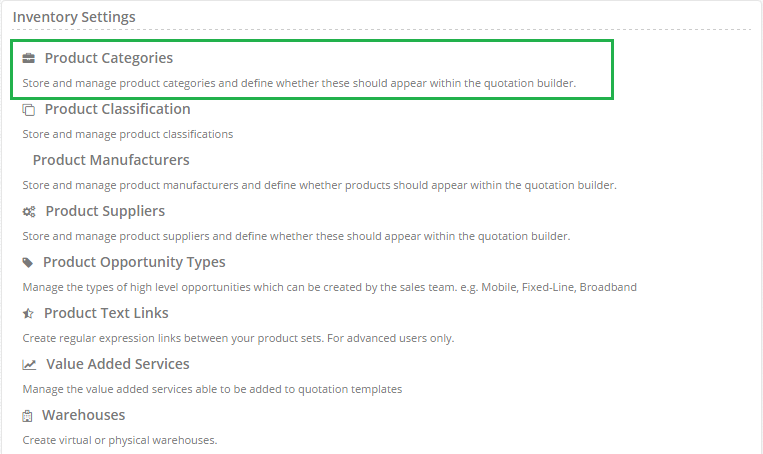
4. Decide which of your base categories is appropriate and select the chevron beside it to expand on the options within the base category e.g. Mobile, Mobile phones.
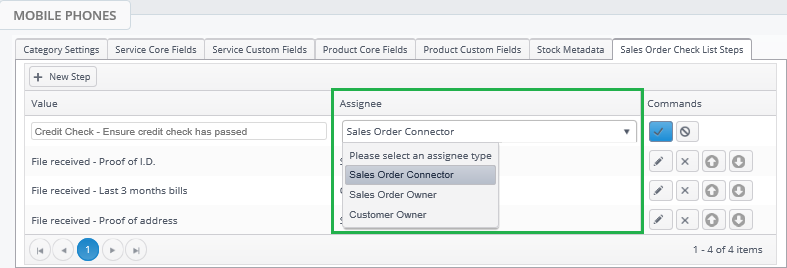
5. The Layer will then direct to you to that Product Category Type, open the Check List Steps tab
6. From this tab you will then see any existing steps which can be edited by selecting  button or you can add in new steps, to add a new step press
7. Type in any new step e.g. File received - Last 3 months bills, or to save any edits you have made simply press 
8. Select the type of assignee that the task will belong to i.e. Sales Order Connector, Sales Order Owner or Customer Owner
9. Repeat until all the steps required for the check list have been added
10. Once all of your steps have been added they can be reordered by pressing the  arrow buttons to move items up or down.
11. Once all your steps have been added and you are happy with the order press Save
You have now successfully created your check list steps and we will now view these in the next section.
Can checklist tasks be assigned to different users?
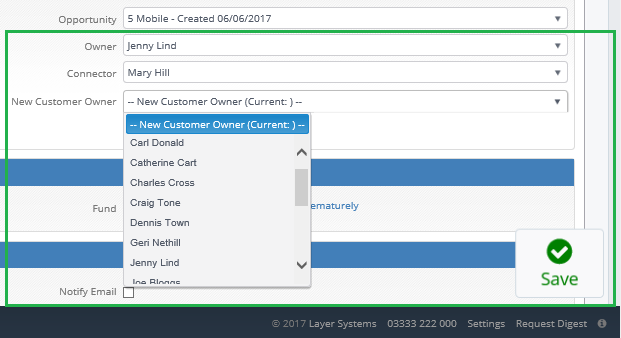
Yes, as mentioned above, the checklist tasks that have been assigned can be assigned to either the sales Order Connector, Sales Order Owner or Customer Owner, and is set at the point of creating the check list task.
The owners are set within the actual sales order, once an owner or connector is assigned any open checklist tasks will then be sent to that owner. To set the owners or connectors open the Header tab within the Sales Order and update:
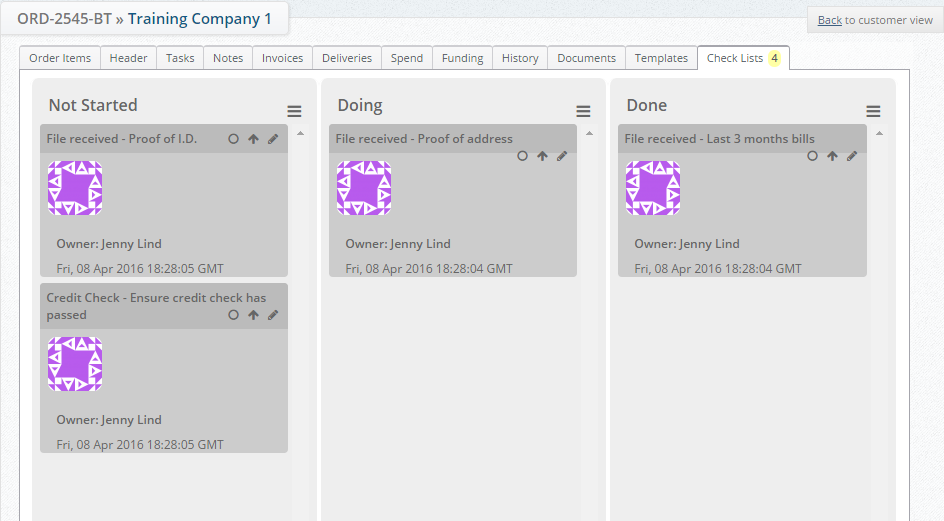
Checking your Check List steps
Now that you have successfully added your check list steps to your sales order type it is time to view the check list, we recommend that you test this in a training company account as you will need to create a sales order to view your steps.
If you don't have a training or test account then alternatively you can create a sales order in an appropriate customer record. To view your check list steps follow these simple steps:
1. Create a quotation that is then converted to an order.
2. Open the order you have created
3. Once opened you will see that there is a tab titled Check Lists (number of steps in brackets)
4. Open this tab
5. The check lists steps that you have created will now be displayed for users with this sales order type to ensure they do not miss any of these check list items, and the check lists can be moved into the appropriate stack of Not Started, Doing & Done: