
Within the Layer users are able to create invoices, typically Invoicing stacks will be available from the Finance Module in the Layer however users are able to have invoice stacks in any of the modules:

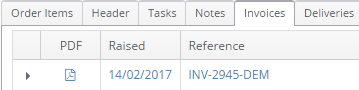
Invoices can only be created within a sales order, the Invoice Tab will show any invoices that have been created against a sales order:

The information within the Invoice Tab in the sales order is as follows:
| PDF: | Click here to download the invoice PDF |
| Raised: | The date the invoice was raised |
| Reference: | How many items have been added to the invoice |
| Items: | How many items have been added to the invoice |
| Total ex. VAT: | The total excluding VAT |
| Total inc.VAT: | The total including VAT |
| Fund Discount: | Any hardware fund discounts that have been applied to the invoice |
| Payments: | Any invoice payments that have been received |
| Credit Notes: | If any credit notes have been applied then the total of the credit note will be displayed here. |
| Refunds: | Any refunds amounts that have been issued will be displayed here |
| Balance: | Any outstanding balances will be displayed here. |
Sales Order – Creating an Invoice
To create an invoice for the order products users must follow these steps.
1. Select the item(s) that require an invoice and then press the Invoice button.
N.B. Recurring services cannot be invoiced.

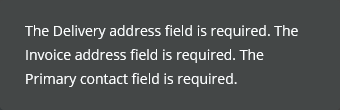
N.B. If the header tab has not been correctly configured, the Layer will not permit you to create an invoice and a message will be displayed advising what is required:
Your invoice will then be visible within the Invoice Tab:
Clicking on the invoice reference will direct users to the Invoice Manager page and the following info must be populated:
| External PO Ref: | This will pull through from the quotation if the customer has provided this when electronically signing the quotation. This can also be entered here if it previously has not been entered. |
| Nominal Code: | An invoice nominal codes |
| Terms: | These are the payment terms that must be applied to an invoice and these are as follows:
|
| Reference: | The Layer Invoice Reference will be displayed here |
How to Add an Item to an Existing Invoicing
If you have to add an item at a later stage of the order and have to add it to an existing invoice you will have to append it. To do so tick the box against the item and invoice as illustrated above. In the next pop-up window click Append Invoice.
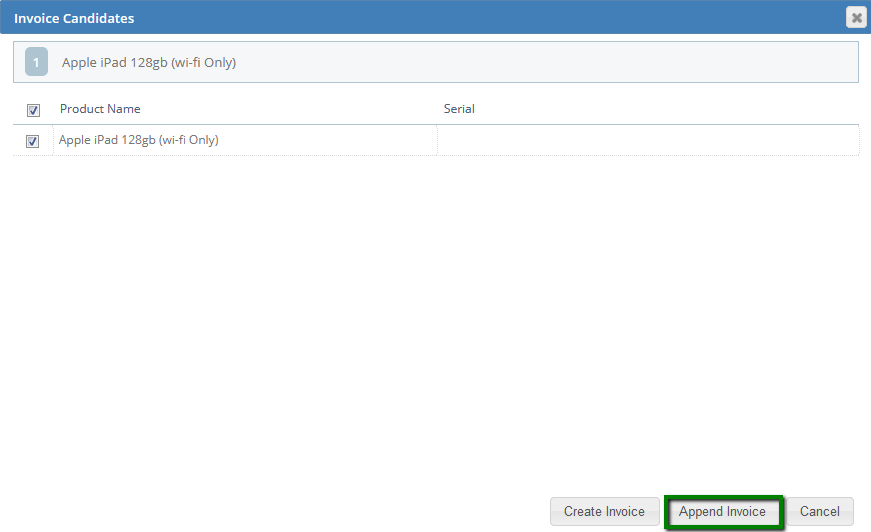
You will then be asked to choose what item you would like to add the item to. Select the relevant invoice from the drop down and press next.
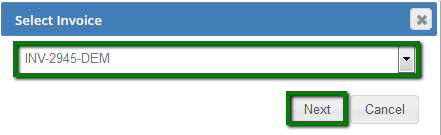
This will then take you to the Invoce manager where you can send the invoice to the customer as normal.
Checking the customer balances
Once the invoice has been created, if this is against an existing customer record i.e. not a lead that has converted to a customer, users should check the customer’s available balances to check if payment can be taken from any funds that are available. The balance will be found on the left hand side of the customer record and the sales order.
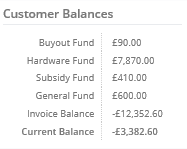
Customer Debts
Prior to any quotation being quoted it is expected that users check the customer’s balance to ensure there are no outstanding monies that are owed. If a customer is owing money then it is expected that the quote would not be provided until all debts are settled. However if this is missed for any reason the balance would alert users to this.
In the example above we can see that our customer has a negative balance of -£3382.60 in this instance if there was an issue at this point we would apply a flag to the customer record to ensure that no further orders were placed until monies are recovered. Please see our article on Customer Flags.
Applying a hardware fund – From within the invoice manager
The +Fund Offset feature within the Invoice Manager will allow users to use any hardware fund that is available within the account to be applied as a payment to the order.
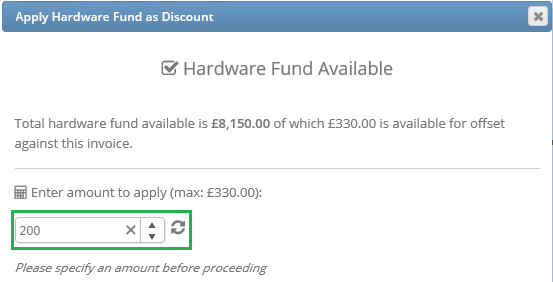
Press the +Fund Offset button, the Layer will now present the Apply Hardware Fund as Discount window. Here the Layer will display the total hardware fund that is available against the invoice, it will also allow users to apply part payment. Enter the amount that should be offset wish to offset and press Enter.
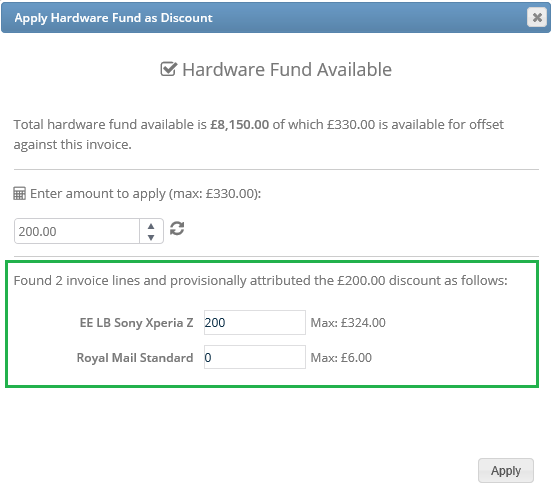
If there are multiple lines within the invoice where the hardware fund could be applied the Layer then the Layer will allow for this:
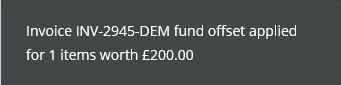
Once the amount has been entered press Apply, the Layer will then confirm that the fund offset has been applied:
The +Fund Offset Total will also be updated within the Invoice Manager window:

Removing a hardware fund
If a hardware fund has been applied incorrectly, simply press the cancel symbol:

The following message will then be displayed:

If you still need to add a hardware fund simply repeat the steps above and re-add.
Emailing the invoice
To email an invoice simply click on the  button and the Layer will trigger a new email window with the invoice attached. Any contacts that have been saved against the record with an email address will be available within the To drop down button.
Within the email window users can amend the email body with any additional information that may be required.
Printing a hardcopy of the invoice
Should a paper copy of the invoice simply press the button and the Layer will download a PDF copy of the invoice so that you may print it.
Deleting an Invoice
To ensure that you are compliant with HMRC guidelines you should not delete any invoices.
Please see our knowledgebase article for further information.