In The Layer it is possible to store your Insurance assets and link them with the products and services. First of all, please ensure you have a Product Category created for your Insurance services in your price books. In case there isn’t any, you would need to create one. Please follow the instructions in this KBA to do so: How to create a new base category
Another thing to check before you start working with your Insurance services in The Layer is to ensure that you actually have any services added in your price books against the Insurance category.
In case there aren’t any, you will need to either import them or to add your services manually.
You will also need to configure the core fields of your new/existing Insurance base category. This can be done in Settings zone, via Product Categories section. In Product Categories, please search for the Insurance category and click on its title. In the following window, go into the Service Core Fields tab.
As the insurance assets should link to the hardware asset, we advise you to do the following steps:
Change the MSISDN field label into IMEI - this will then rename the field in the assets, as well as in grids into IMEI and enable you to search for the assets by IMEI.
Change the Temp MSISDN label into MSISDN - this will enable you to add MSISDN into your Insurance asset, as these will not require Temp MSISDN, however, they might require MSISDN.
See image below: 
The other fields we would advise you to enable for the Insurance product category would be Expiry Date, Recurring Cost, Initial Cost, Term, Supplier, Intermediary, Reference - this could be renamed to Policy Number.
Once this is all set up, you now have two options on how to add your Insurance services into your assets:
- Add them into a Quotation
- Add them into a Sales Order
How to add Insurance services into a quotation
Step 1: Create a new quotation
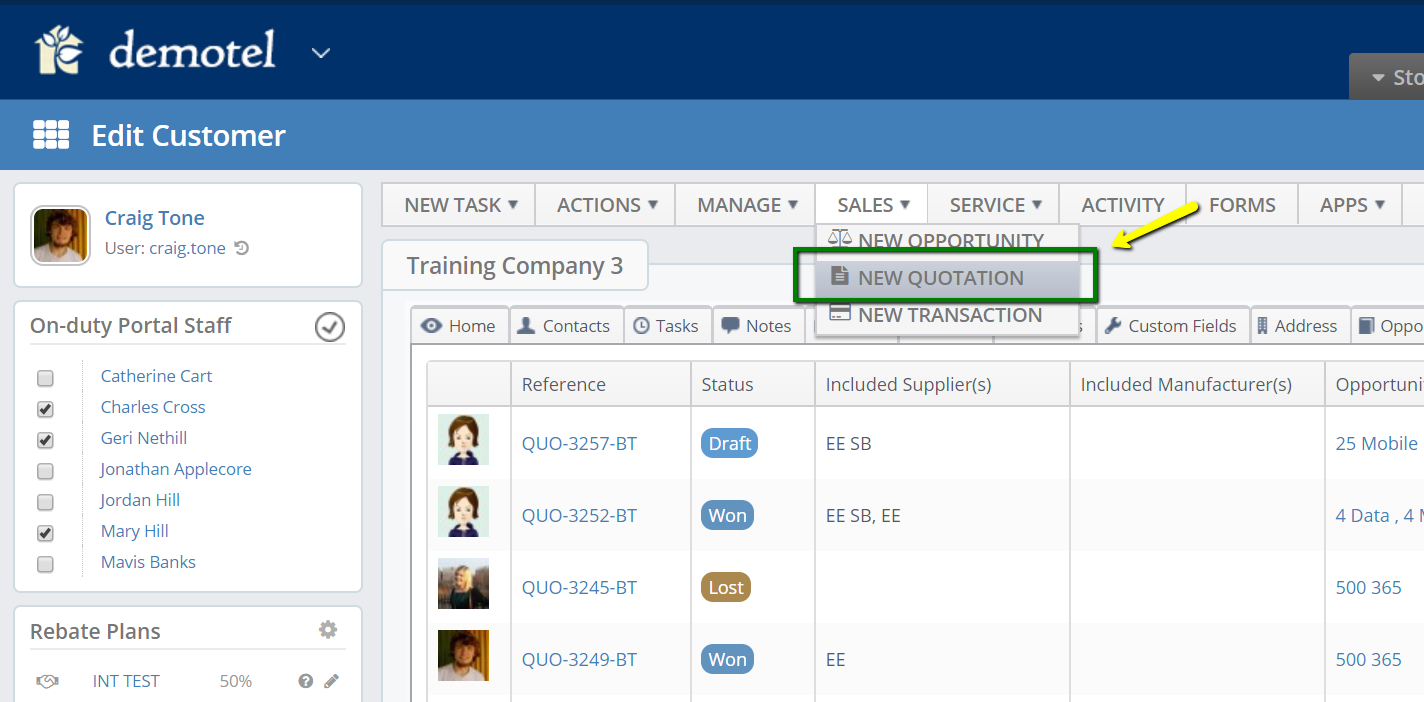
Open the customer record you want to send a quotation to and click Sales and New Quotation, as per image below:
Now you need to choose a Shipping and Billing address, Contact, Opportunity (please refer to this KBA in case you need to create a new opportunity) and the Output Template for the new quotation and click Create.
Step 2: Add products and services into the quotation
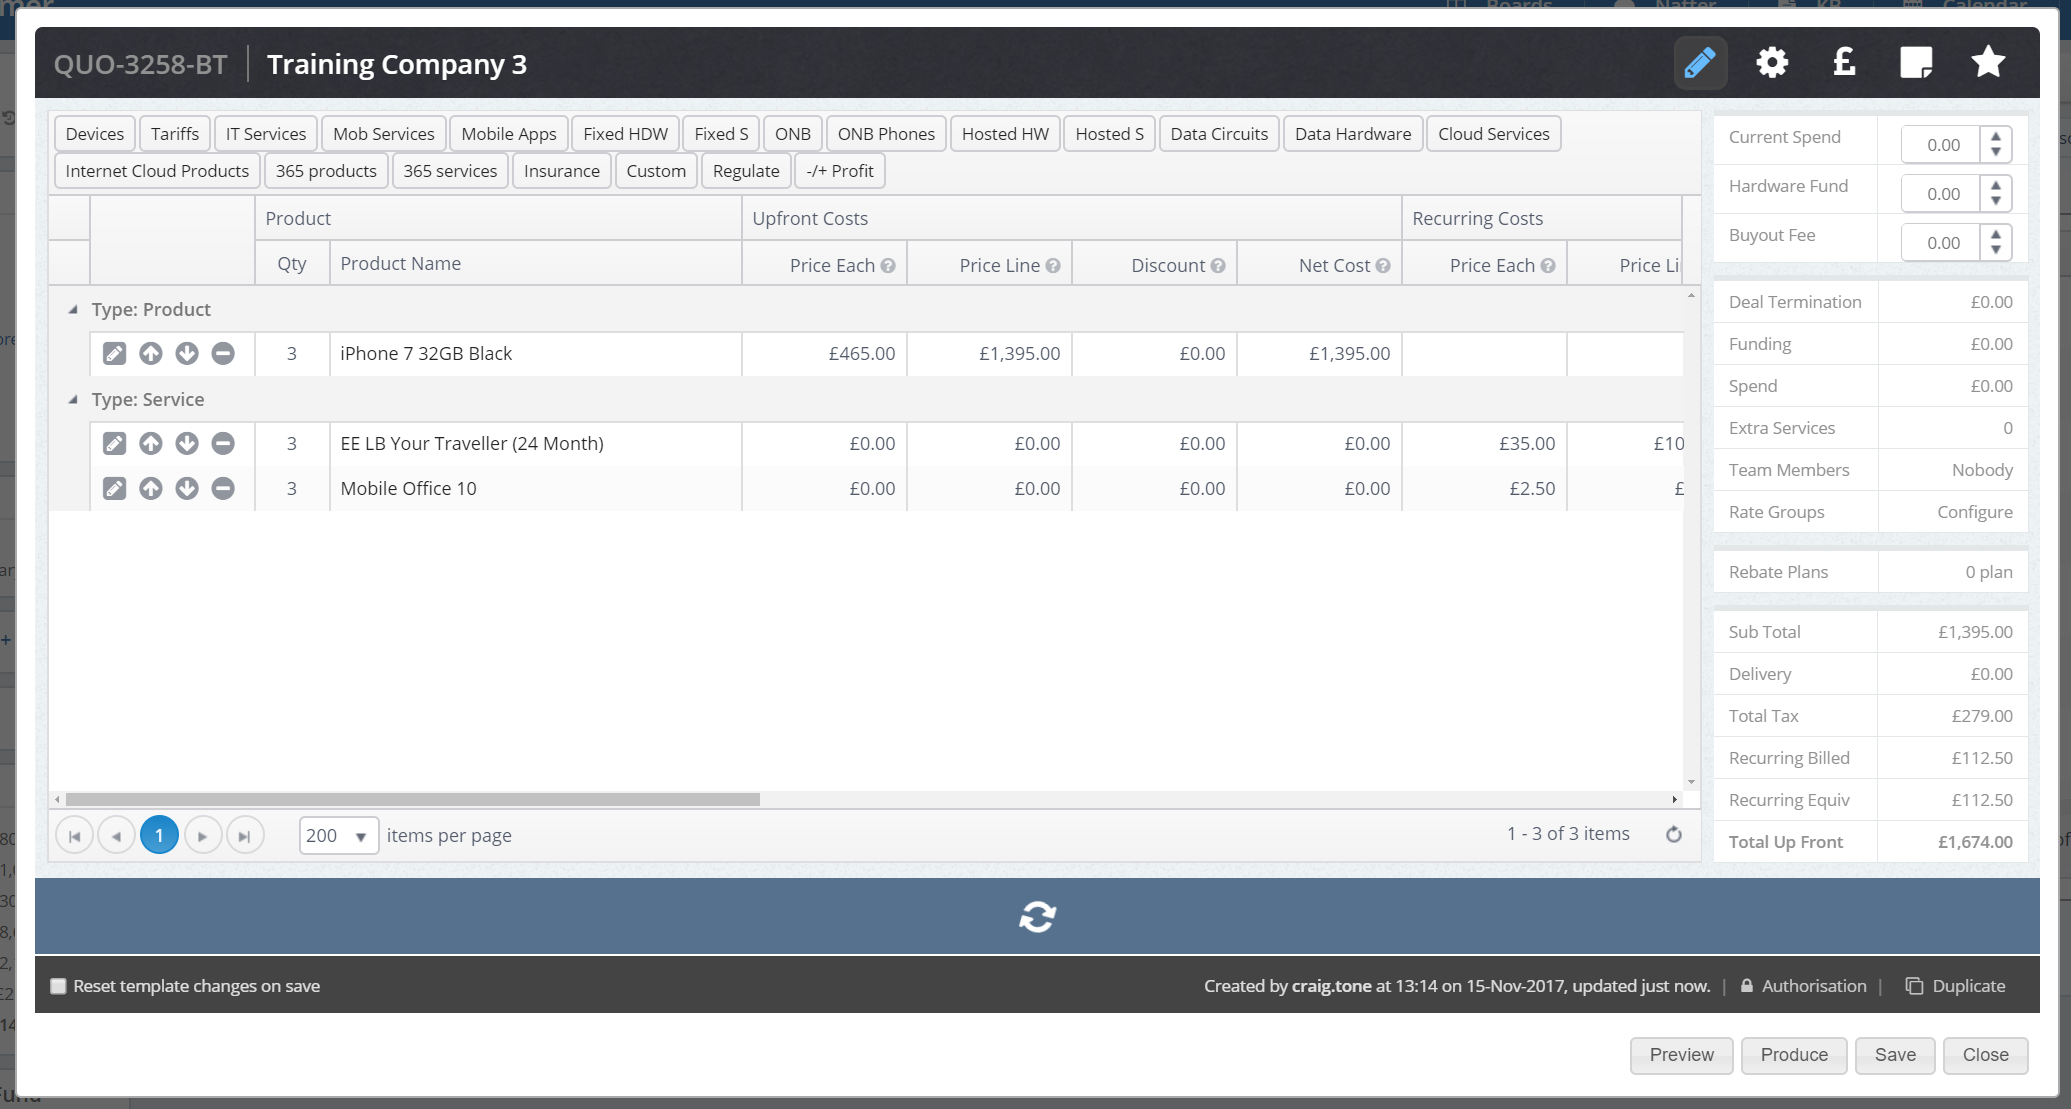
You will be then directed to the quotation builder window. In our example, we will create a quotation for 3 iPhone’s 7, 3 mobile tariffs and we’ll also add 3 Insurance services into the same quotation, to be able to demonstrate how these can be linked together in the final stage of the process.
Please note, that this does not necessarily have to be done this way in your case, you don’t always need to link mobile services with the Insurance, and sometimes you might only need to add the Insurance Service itself into the quotation and link it with the product that is already an existing asset. However, we have chosen our example to be able to demonstrate the whole process in one example.
To add all of these into a quotation simply open the Product Category of each of these products (in our example these are Devices, Tariffs and Insurance) and add them into the quotation. For a deeper understanding of the quotation builder please refer to this article: Getting started with the quotation builder.
In the end, the quotation will look as per below:
Step 3: Send out the quote
From this stage, a usual sales process takes place, which includes sending a quote to a customer, signing / winning the quotation and its further conversion into a Sales Order.
How to add Insurance services into a Sales Order
In this stage we will take you through a step by step guide on how to create a sales order with Insurance services without generating a quotation first.
Step 1: Select new sales order
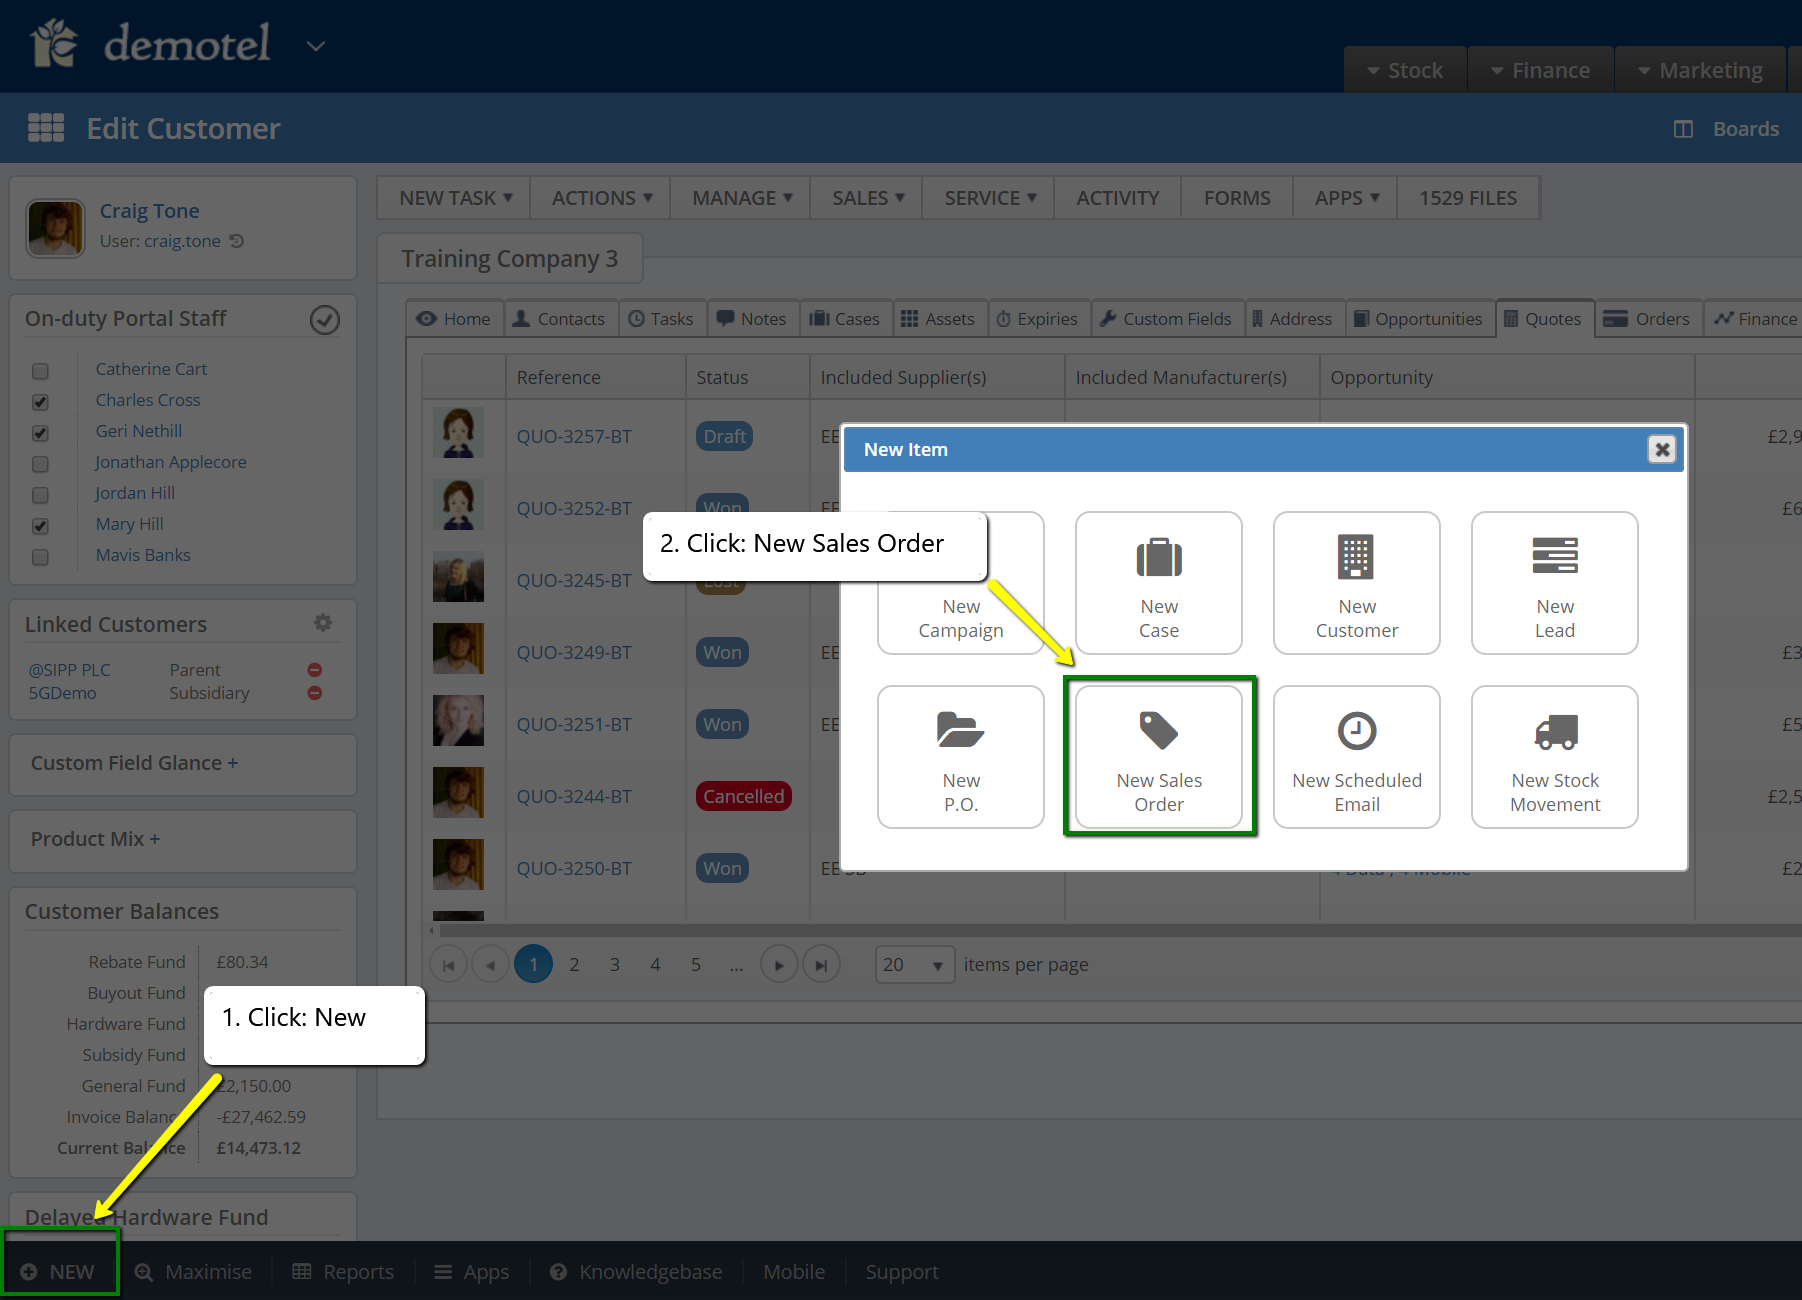
Select the ‘New’ tab at the bottom left of the screen as indicated below and click New Sales Order:
You will now be directed to the New Sales Order screen:
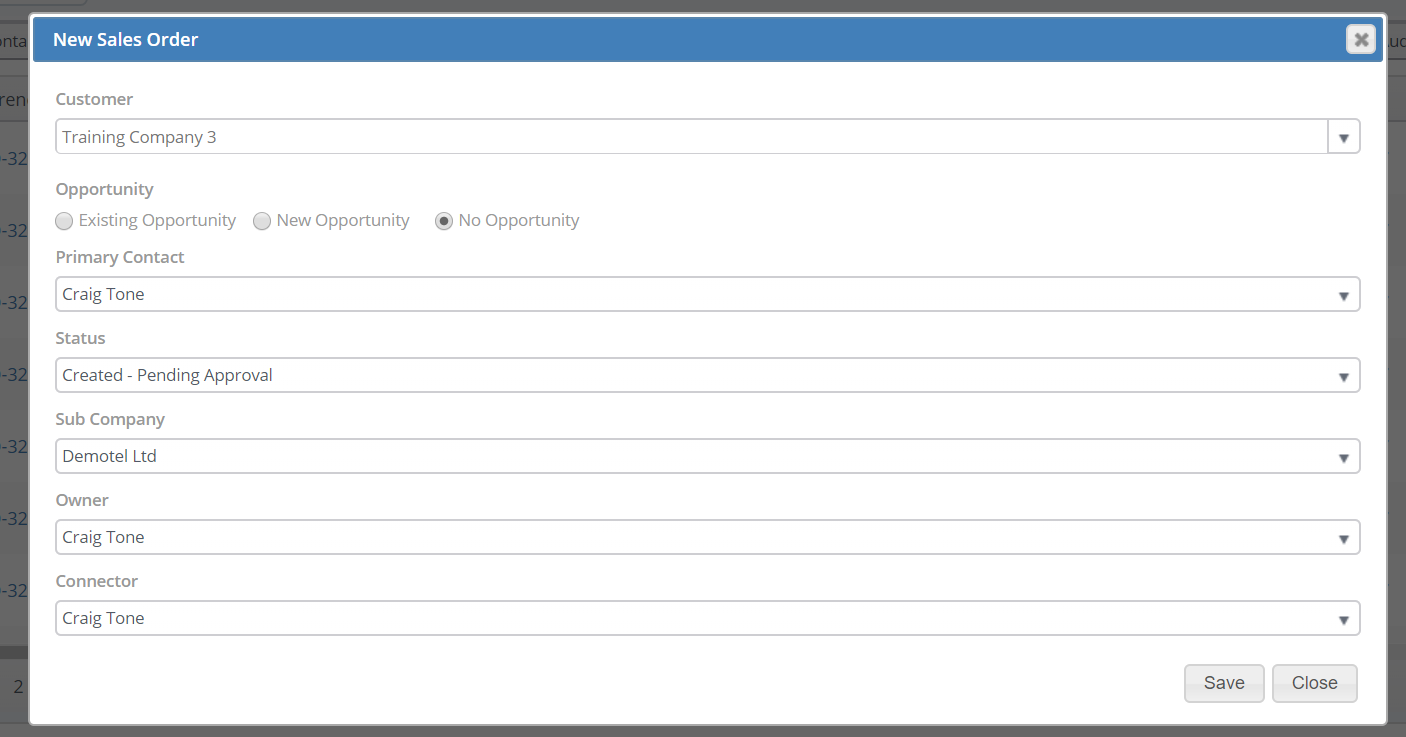
Once you’re here, you need to select a Customer, Opportunity (Existing, New or No), Primary Contact for the SO, Status of the SO, Sub Company (if required), Owner and Connector.
Once you’ve got it all added, click Save.
Your Sales Order will be now created and by clicking Yes in the screen below you will be directed into the Sales Order.
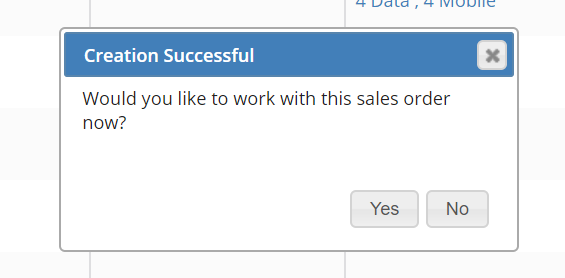
N.B.: Based on your default settings, your Sales Order might need to be authorized prior to adding the items into the SO. This is indicated by a yellow box under the Sales Order Reference, as per image below:

Go into the Header tab and click Approve this sales order, if you have been granted the necessary permission to be able to do it. If not, please contact your Sales Order authorizer to authorize the SO for you.
Step 2: Select items for your order
Now you will need to select the products you wish to order, please click on the ‘New Item’ as indicated below:

Similar to quotation, we will create a sales order for 3 iPhone’s 7, 3 mobile tariffs and we’ll also add 3 Insurance services into the same order, to be able to demonstrate how these can be linked together in the final stage of the process.
Please note, that this does not necessarily have to be done this way in your case, you don’t always need to link mobile services with the Insurance, and sometimes you might only need to add the Insurance Service itself into the sales order and link it with the product that is already an existing asset. However, we have chosen our example to be able to demonstrate the whole process in one example.
To add all of these into the order simply open the Product Category of each of these products (in our example these are Devices, Tariffs and Insurance) and add them into the sales order.
In the end, the sales order will look as below:

Step 4: Reserve and allocate your order
Please note, that starting from here the process also applies for the Sales Orders that were converted from the quotations.
You are now able to reserve the stock item or alternatively you can reserve and allocate as shown below:

In our example we have selected reserve and allocate. In case an item would not be currently in stock, the order would be pending until the stock item would be booked in. To book in the stock please follow our KBA on How to book in stock. This will then allow you to book this out for delivery.
Step 5: Convert order items into new customer assets
This can be done using the "Data Capture" tool which is accessed via the "Convert" button on any sales order detail view.
Starting the conversion process
From the sales order click on the Data Capture tab at the top of the order, then choose to work with either the Mobile products or services, or Insurance products or services in the sales order.

As you can see in the image below, some of the fields are pre-populated with the data from the Sales Order. What we need to update here is the Connection Date (Expiry Date will be calculated automatically by the Term), MSISDN (if necessary - this should be same as the MSISDN of the Tariff linked with the Insurance service), IMEI of the product linked with the asset, and what is crucial for us to be able to link Insurance with Devices and Tariffs is to update the User column. In our example, we have added Demo User 1,2 and 3.

You will also need to update the Action column, based on whether you’re updating or creating new assets. In our example, we are creating new assets, thus the column looks as below:
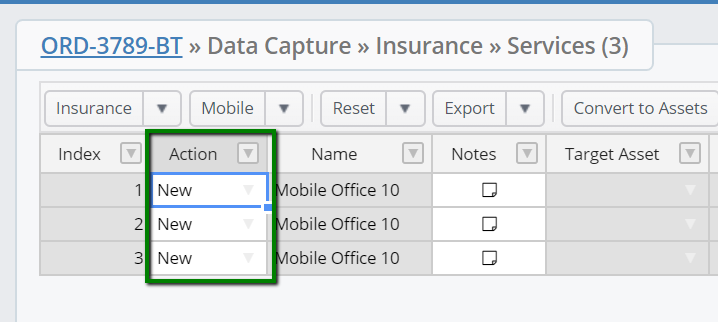
Now we can go on with updating the Data Capture for Mobile Products and Services. Click Mobile and choose Mobile Services.

In here, please follow your usual process of filling in the required fields for your mobile services, and ensure you will also update the User column the same way you have populated the Insurance services.
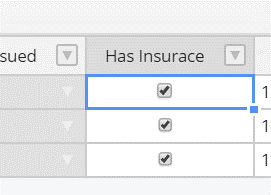
Once you’re ready with this, proceed to Mobile Products and follow the same process. Also, ensure that when updating Data Capture for products, you will tick the tick box in the Has Insurance column.
Finalising your conversion
Once you have populated all the required data, click Convert to Assets.

What if I don’t want to process a quote or sales order?
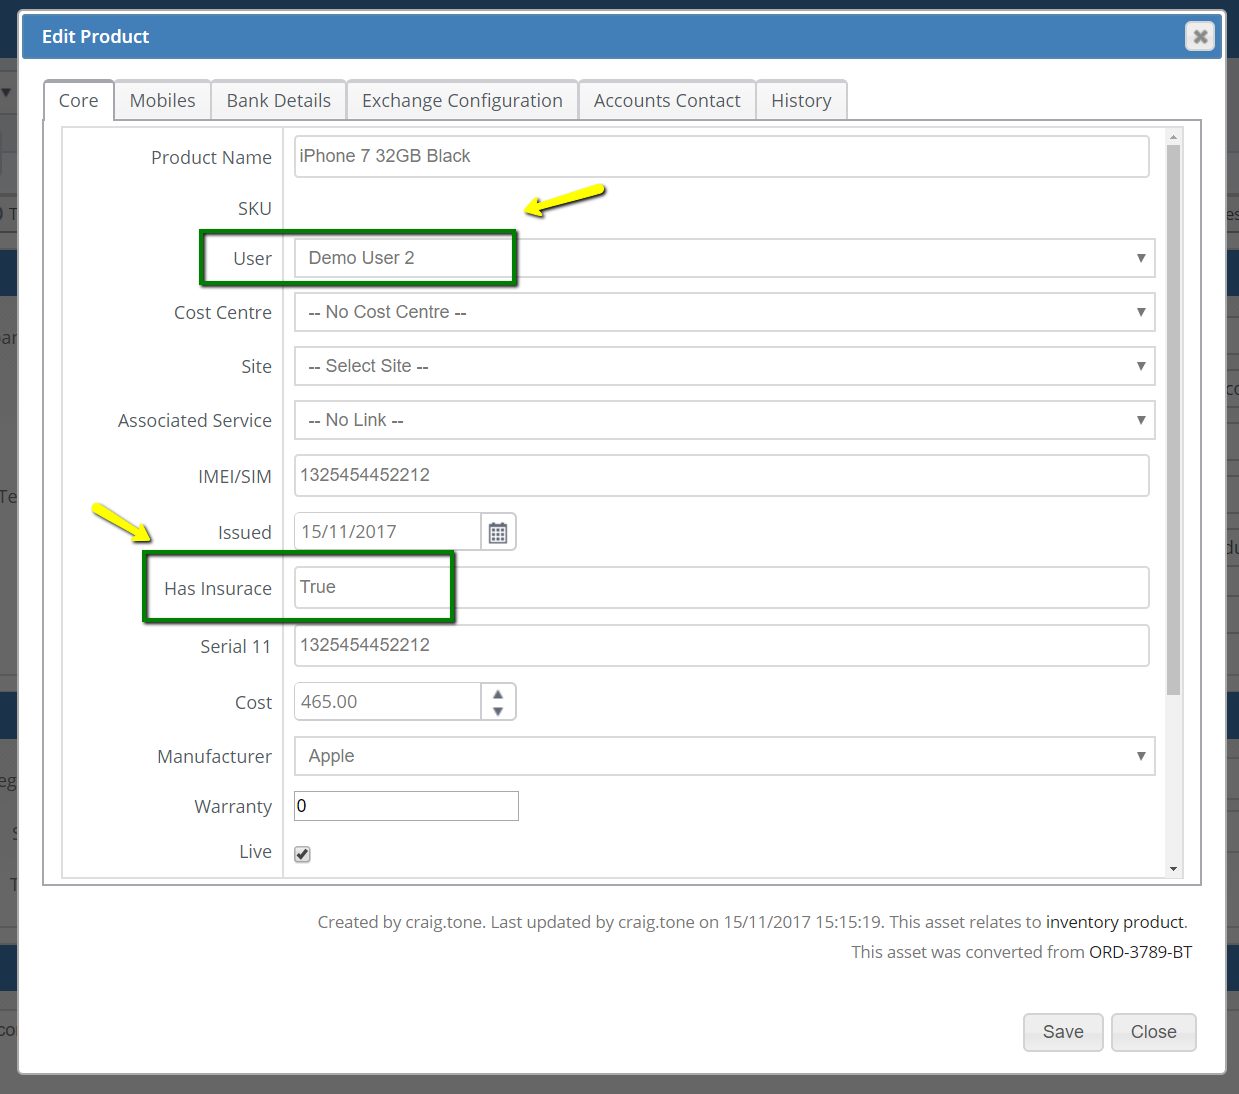
For users who don’t want to process a quote or sales order, it is possible to update the True/False field included in the asset view only. See image below:
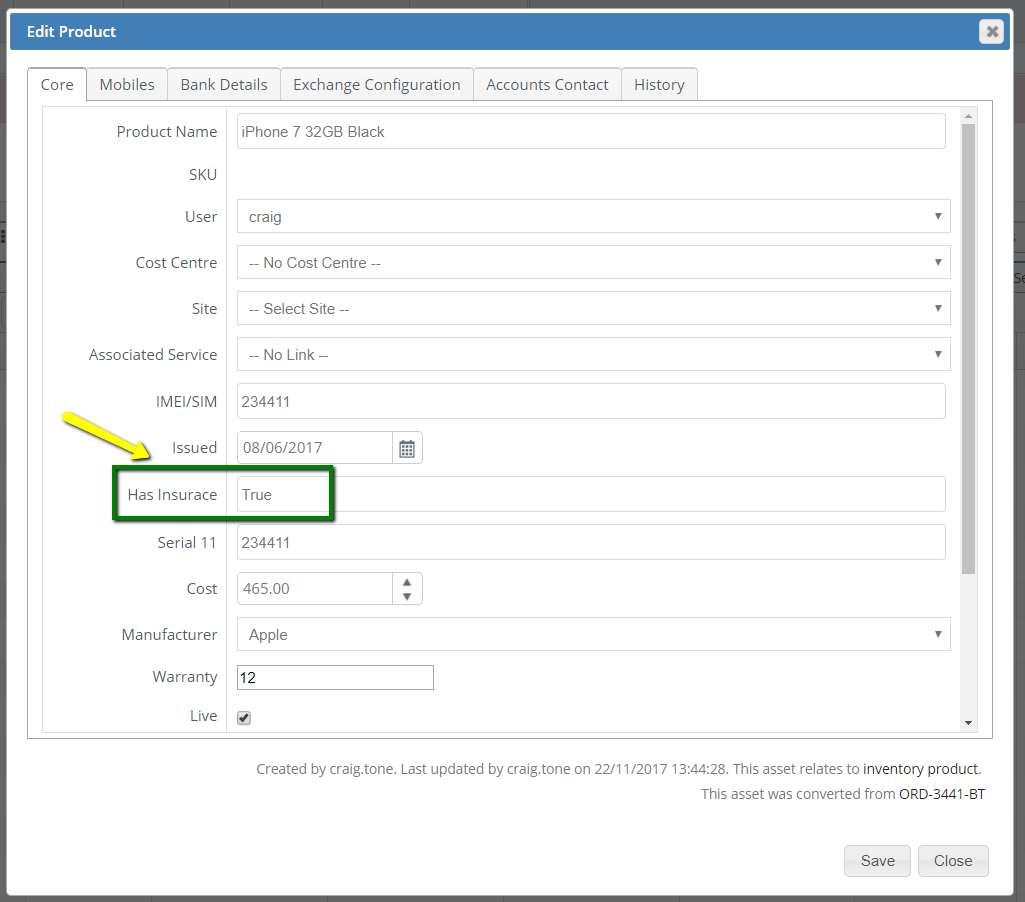
By default, the Has Insurance field is set to False.
The downside of doing so, is that the cost, supplier and term aren’t visible, however if this isn’t important, simply updating this field will indicate whether the user has insurance attached to their line.
How to see which Product links to which Insurance asset
Customer Record view
To see how the created assets are linked from the customer record, open the Assets tab and choose the base category, in which you want to see this – you can choose either Devices, Tariffs or Insurance. In our example we have chosen the Devices category.
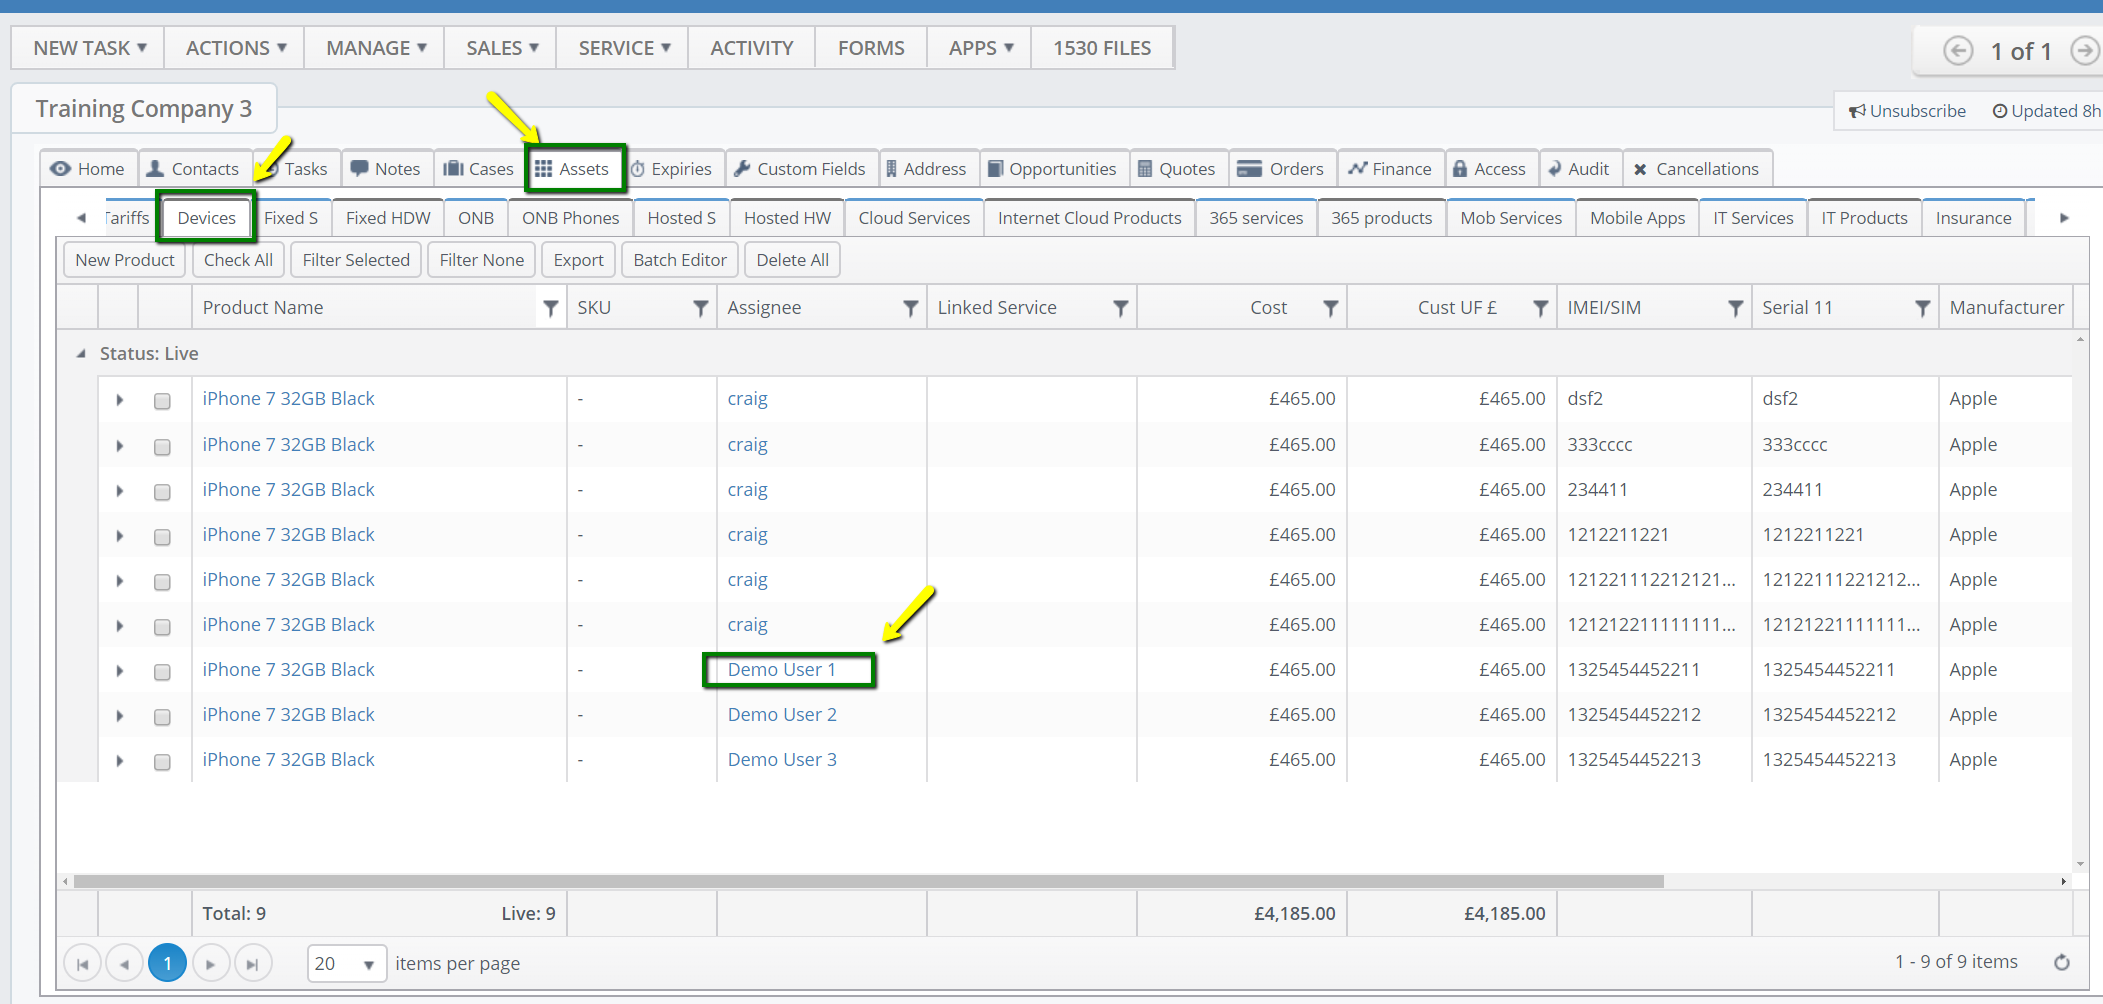
When you click on the Assignee name, the following window will appear:
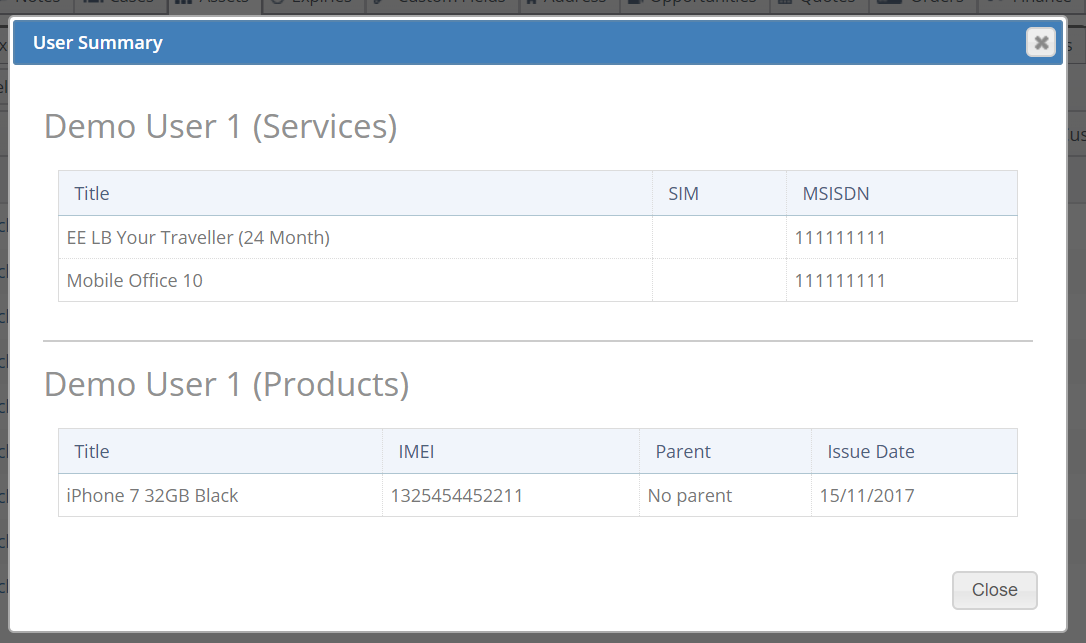
From here you are then able to see the Insurance asset that’s linked with the product.
Search by IMEI
If you have the IMEI of your product and you would like to see whether it has an Insurance or not, you can find that out using Global Search functionality.
Enter your IMEI into the search field as per below:

Following window will appear:

Click the record title and you will be then directed into the product asset window. From here you are then able to get the information whether your device has an insurance or not, and you are also able to find out the name of the User, which you can then use to identify the insurance service asset.
Managing insurance through Cases
All your Insurance claims or queries should be logged in The Layer as Cases. We would advise you to create a Case Category called Insurance, and you can then add more specific sub-categories, such as:
• Insurance claim – Damage
• Insurance claim – Stolen
• Insurance query
Please follow the instructions in the KBA on How to Create a New Case Category.
Within the case, you can then do the following:
Link the affected products/assets with the case
Within a case, you have the Affected Assets tab. Within this tab, you are able to link your handsets and insurance services that are linked with your case. See image attached:
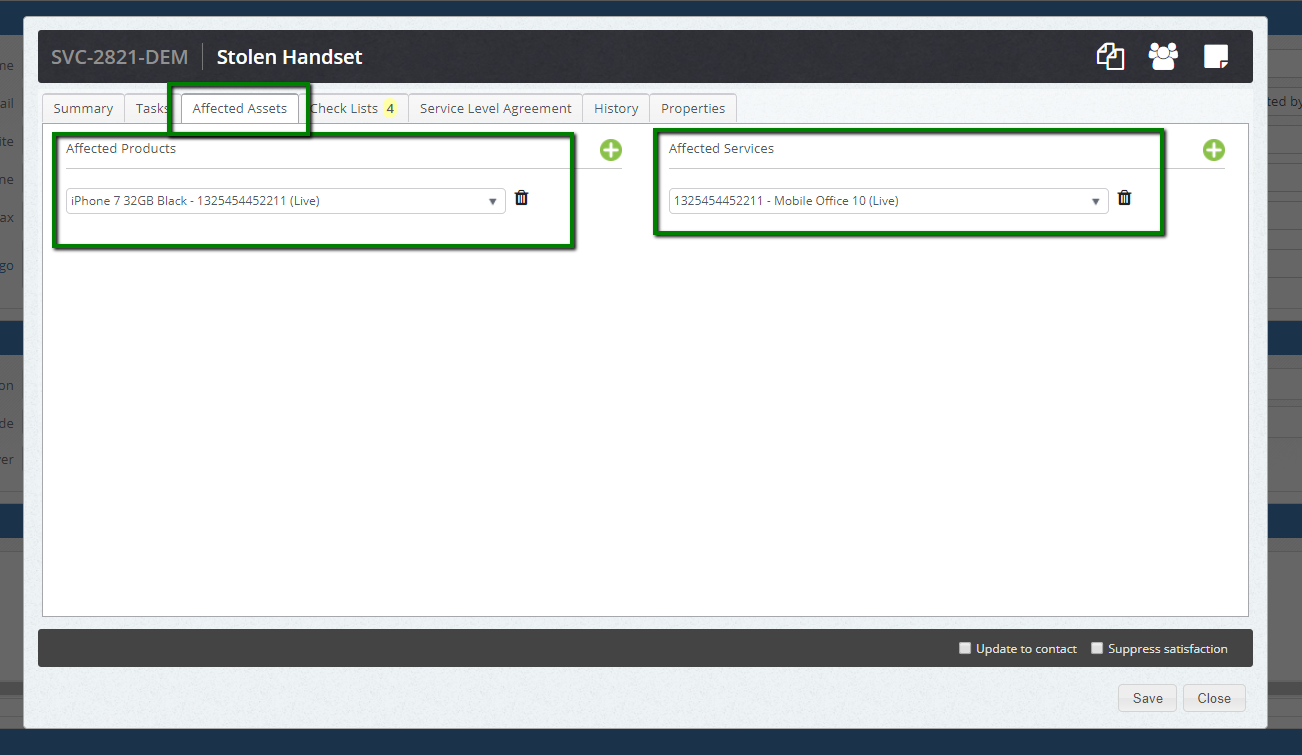
For better understanding of how the Affected assets work in The Layer please follow the KBA on How to use Affected assets in cases.
Record the Costs
If your Insurance assets are 3rd party billed, you might still need to log the costs on your insurance claim. You can do that using the Costs feature. Go into the Summary tab in your case and click the plus icon as per image below:

From here you can then add the sum of the costs as well as the reason of the spending:
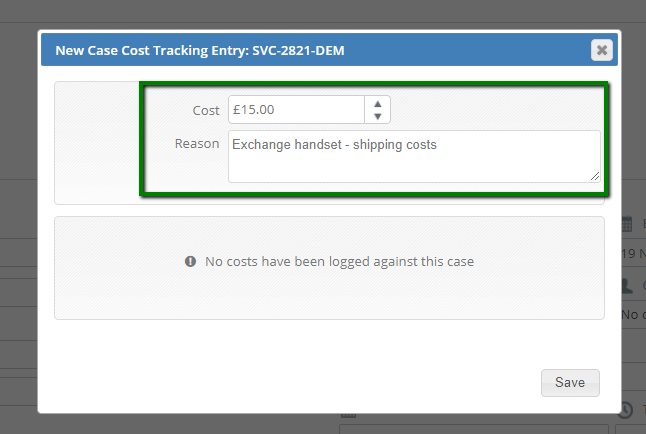
You are also able to create work stacks based on your costs, as well as to get the reports of these, if needed. Please refer to the following KBA for more details: How to log time and cost against a case
Use the Check Lists
When it comes to Insurance claims, it occurs very often that there is a strict process existing that needs to be followed. In The Layer you are able to log each stage of the process as a Checklist step and add it against the case category. These would then appear in the Check Lists tab within your case. See image below:
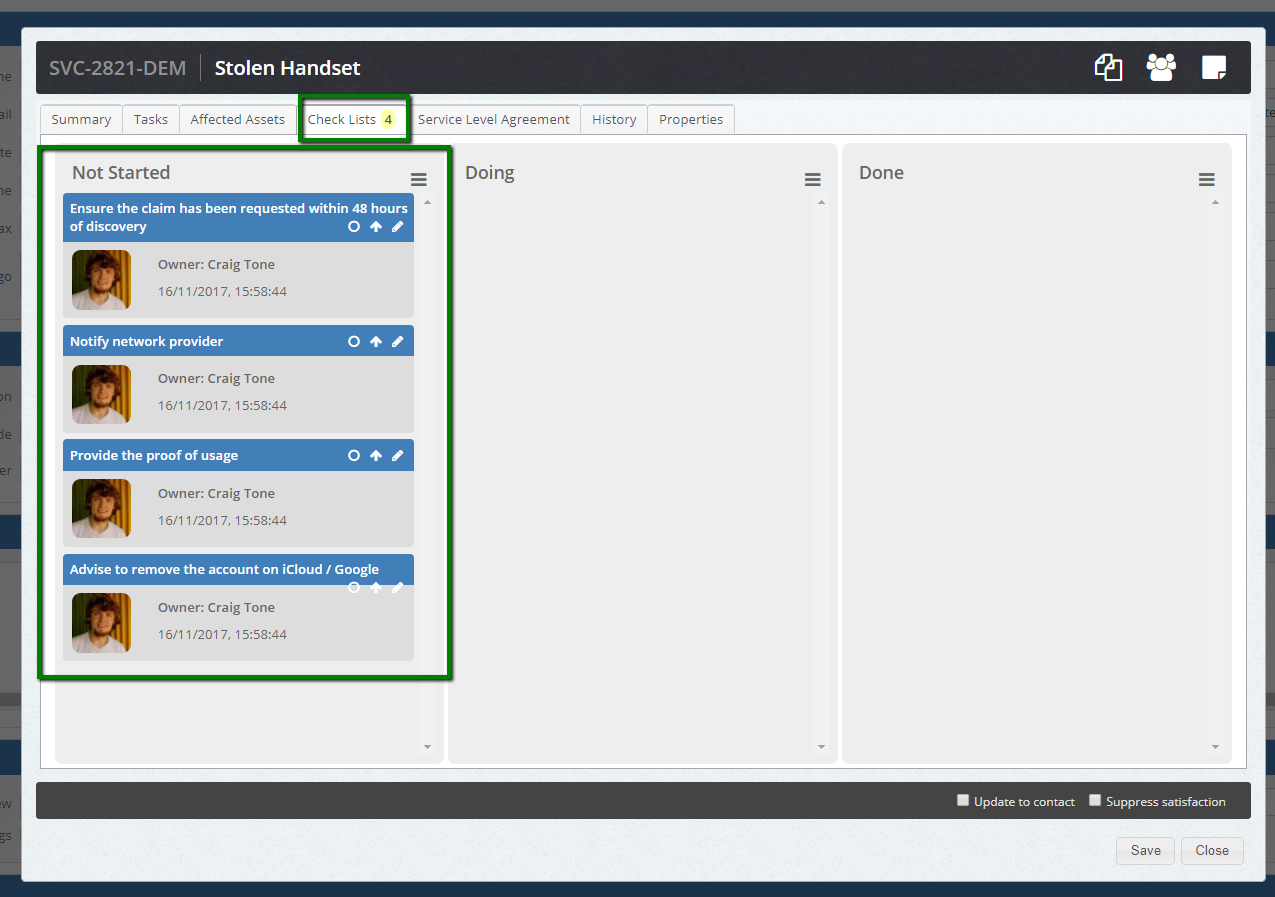
For better understanding of Checklists and the way how to create them please see the KBA’s below:
Understanding Checklists: How case changes affect checklists
How to create case category checklists
Record and report on the outcome of the claim
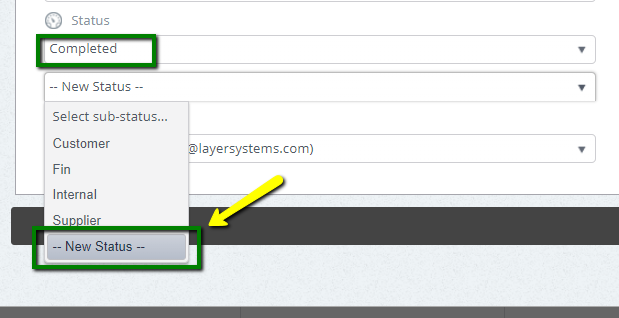
Once your claim is resolved, you are able to log in the Resolution reason in The Layer, that will then enable you to get the report of these, e.g. the list of repaired / replaced handsets. To add the resolution reason, change the Status of the case into Completed and then click on Select sub-status and choose New Status:
The Create Sub Status window will appear and here you can type-in the Resolution reason.
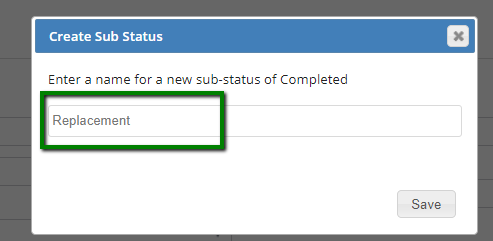
Please note, that once you’ll create a new sub-status, it will appear in the drop-down list of the sub-statuses since then and you don’t need to type it in every time.
To get the report of these, you will need to create a new/ use the existing workstack. In our example, we will create a new workstack for Insurance cases. Go into your Service tab, click New Template in the left-side bar and choose Case. You will be then directed into the New Case Template window. See image below:
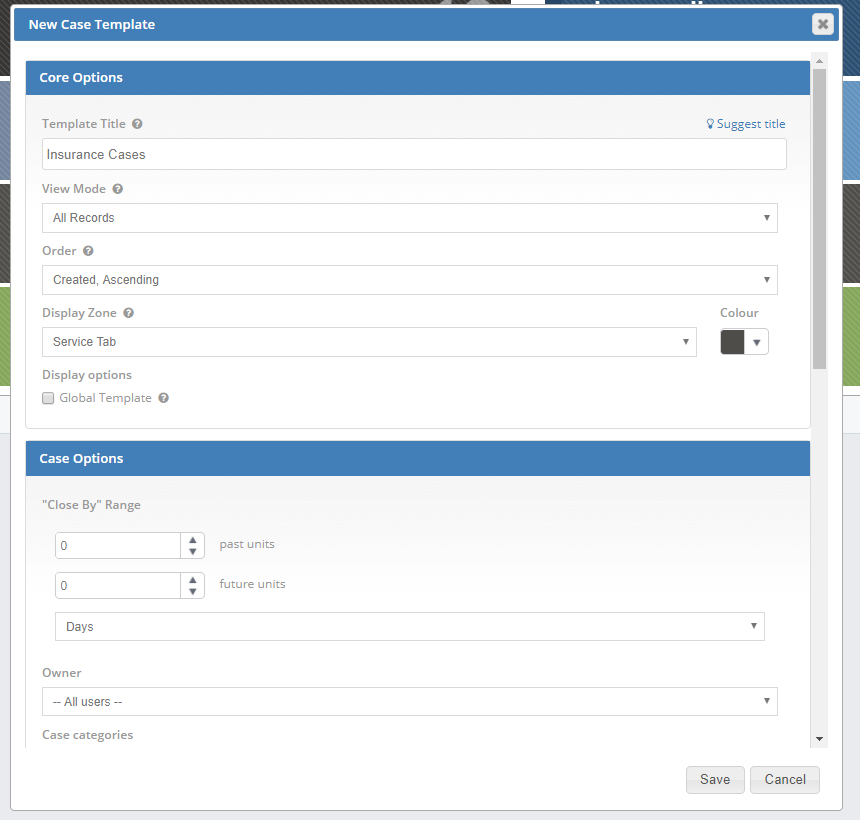
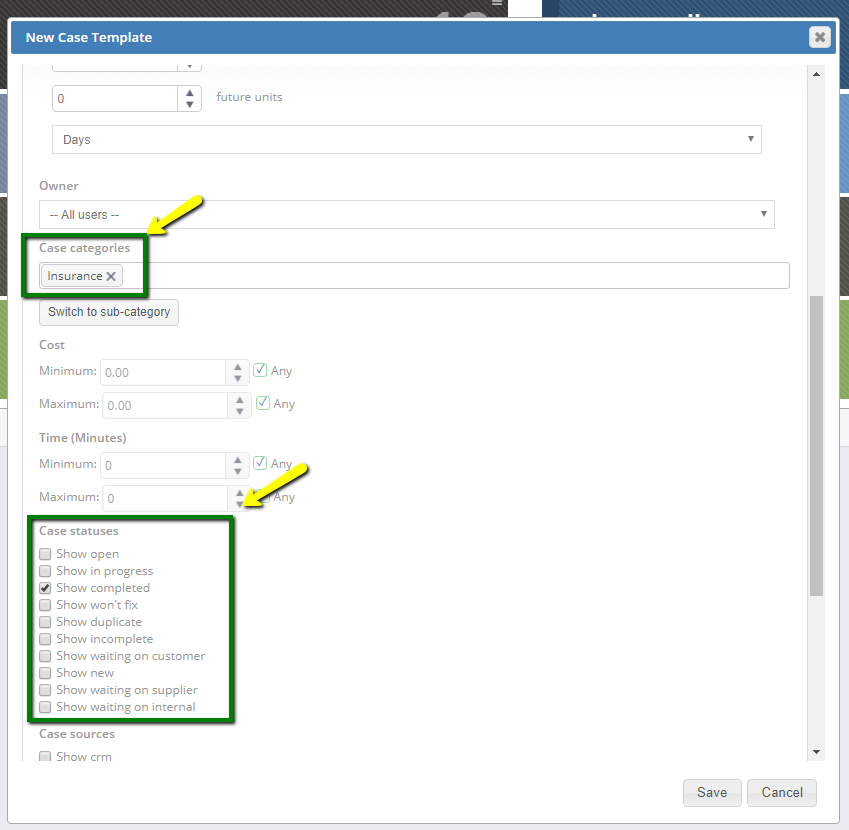
In this window you will then need to populate the fields based on your requirements, in our case we would like to see the cases with the Insurance case category, which means we have to ensure to populate the Case Categories field. We would also like to see only the completed cases, as we’re looking for the report of the cases with the resolution reasons populated. See image below:
Click Save, once you’re happy with your workstack settings and then click Browse Now on the left-side to access the workstack straight away.
Within the workstack, you have the option to Export, as per image below:
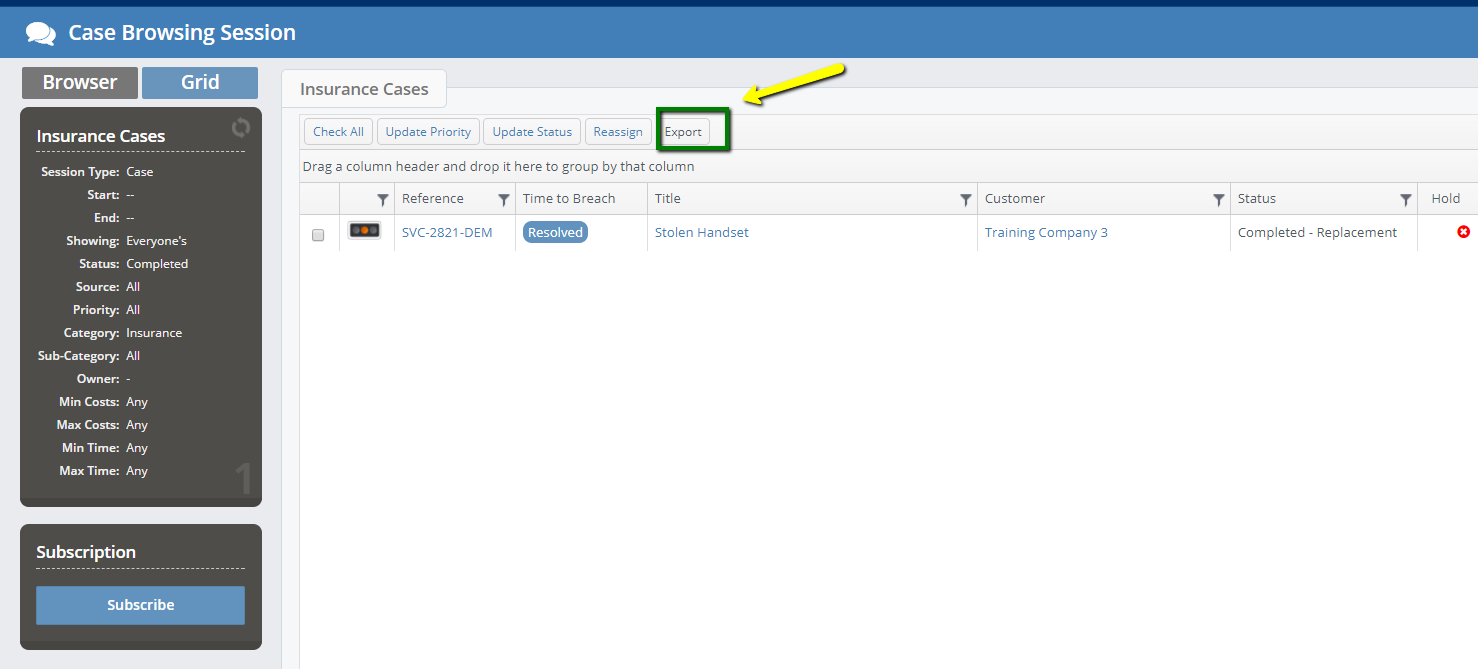
Click the Export button and the Excel spreadsheet will then be downloaded, containing the data from the workstack. Within the export you will have the Resolution Reason column, where the information from the Sub-status will be populated. Using the filter in the spreadsheet will then enable you to get the list of the claims with the same outcome.

We would also advise to create some resolution reasons to start with, for example:
- Claim successful - item replaced
- Claim successful - payment in lieu of replacement
- Claim unsuccessful - invalid insurance terms
- Claim unsuccessful - excessive claims
